 Find the podcast version of this article here.
Co-Design is a highly effective, collaborative approach to developing edtech solutions. It can mean the difference between a solution that achieves your goals and one that teachers and school leaders decide not to adopt. Implementing co-design requires a structured approach…
“Co-design” is a process of working together to discover and design solutions to education challenges and to pursue new opportunities. It’s open and collaborative. In co-design, we evaluate all the ideas that stakeholders bring to the table. And that makes for much better outcomes than designing in a bubble and then realizing too late that you built the wrong solution. But it can also go off the rails without a guiding focus and structure. Co-design, in short, is a discipline you must learn in order to make effective use of it.
If you are new to the idea of co-design, you might be wondering, “why invest the time?”
It’s simple. Co-design ensures that every education solution, resource, product, or technology feature we develop actually solves real-world challenges and actually fits the needs of the people you are hoping it will benefit.

The above photo shows a desire path, an unplanned route that is shorter than the planned “ideal” pathway. This illustrates an important principle of design: If you design a solution without including real people facing real situations, that is going to work against your intended design.
So when do you need to co-design? A collaborative process sounds great, but it’s labor-intensive and time-consuming. Therefore, it’s something you want to consider mainly when developing a brand new resource, product, or solution — or are making major changes to an existing one.
At Speak Agent, we use co-design for complex edtech systems or features that demand high attention to design, that pose potential safety or privacy risks to students, that change daily or weekly teaching practices or administrative processes, or that may be highly impactful for student learning. I can tell you that, without co-design, we’d have wasted a lot of resources building things that no one needed — or things that looked great on the surface, but were hard to put into practice.
For us, co-design has been well worth the investment in time and energy.
Before we run through the ten steps of co-design, let’s first establish three rules of the road:
- Feedback is not co-design. “Co-design” is a collaborative process that gives all stakeholders a voice before and throughout the design process, as opposed to “feedback,” which happens after design is complete.
- All relevant ideas are valid. All participants have the freedom to explore new ideas, challenge assumptions, and to examine “what if” scenarios — provided they are relevant to the defined challenge or goal.
- Diverse viewpoints make it better. Co-design works best when it brings together diverse points of view. Acknowledge that participants may have different priorities and interests that they want to focus on — and that’s OK. Everyone has a unique and valuable contribution to make. The co-design team needs the full picture in order to craft the best solution.
A Step-by-Step Guide to Co-Design
So now let’s say you have assembled a cross-functional team of stakeholders with diverse viewpoints. What are the ten steps?
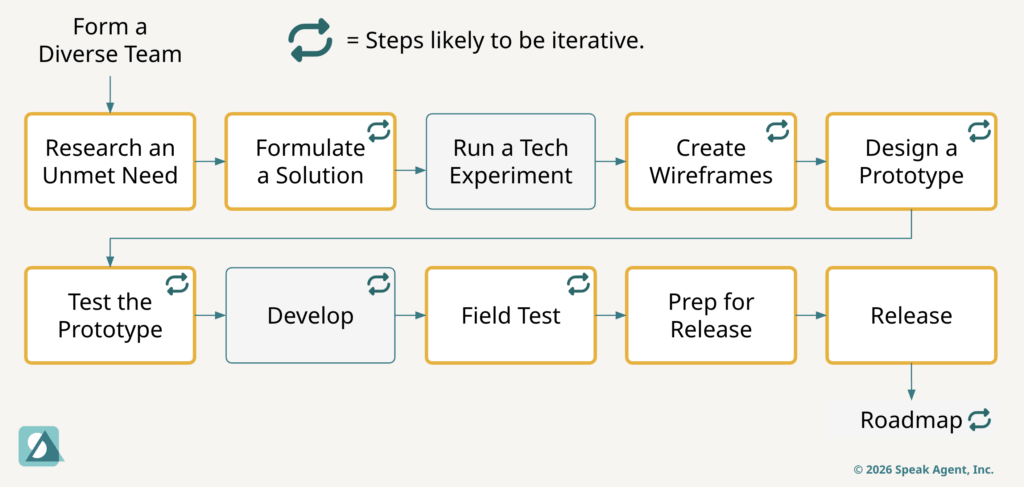
STEP 1: Research an Unmet Need. Define a challenge or goal and deep-dive it from the POV of all stakeholders. Break it down into its components. What are the current processes? Where are the stumbling blocks? What’s missing? What’s frustrating? What needs to be improved? What are the untapped opportunities? You need to ask questions… and then ask follow-up questions. It’s like peeling the layers of an onion to get down to what’s essential.
The biggest mistake you can make, whether you are a school district, an edtech provider, or anyone in K-12 education, is failing to involve the stakeholders in defining the challenge before you try to solve it! Unfortunately, this is also the most common mistake and — full disclosure — I’ve made this mistake myself not once, but many times.
STEP 2: Formulate a Solution Concept. What are all the ideas from all the stakeholders for how to solve the defined challenge? Can we merge these ideas into a cohesive whole? How would it support or change existing practices or processes? What new processes or systems would need to exist? How would this solution work in our mind’s eye? What are the use cases, or concrete examples, of how each stakeholder would interact with the solution or resource?
STEP 3: Run a Technical Experiment. In edtech, this happens “off-stage” outside of the co-design team. Subject-matter experts such as software developers check the technical feasibility of the solution concept. How complex would it be to develop? For example, they may determine if software code libraries already exist to handle the kinds of use cases or systems we’d need to develop. They may suggest ideas that build on the original concept created by your stakeholders. Or, they may suggest narrowing the initial scope. This informs our next step…
STEP 4: Create Wireframes. A wireframe is a rough, semi-visual design that illustrates the information architecture for a new edtech solution. The goal is to inspire ideas, raise concerns, and identify things we missed. For each feature, we want to answer the WH- questions:
- Why is it important?
- Who would use or access it?
- When and how often would they use it?
- What situations would they use it for?
- Where would they expect to find it?
This process is iterative and may result in quite a bit of back and forth — and many versions.
STEP 5: Design a Prototype. At Speak Agent, we design our prototypes to be visually accurate and clickable but not functional. Other edtech providers may prefer functional prototypes that are less visual. That’s fine, too! The most important element of prototyping is that it provides a user experience that is a complete thought.
A stakeholder interacting with the prototype should be able to understand what to do and where to click. To complete a process. Basically to interact with the prototype to solve the challenge or goal identified in STEP 1.
STEP 6: Test the Prototype. Now it’s time to put our prototype to the test. What do stakeholders think? Are there places where they get lost or confused? Does it deliver on the promise of the solution we crafted together in STEP 2, or does it fail to deliver?
At this stage, we often find holes we need to plug — things we missed that are not apparent until you start clicking around and trying to find what you’re looking for. This testing step may require several iterations to arrive at a solid design that’s ready for real development.
STEP 7: Development. This happens off-stage. The edtech developers go off and build the solution. For complex solutions or features, development is often managed in phases so that an MVP, or Minimum Viable Product, can be released and then expanded while the first phase is field-tested.
STEP 8: Field Test. Generally an opt-in test group, composed of the types of stakeholders who participated in earlier steps, agrees to trial the solution in a real-world environment such as a classroom — or wherever the intended use may be. This is where the rubber hits the road. The solution had better do the job it set out to do, or else we have to back up one or more steps and adjust!
For field testing, it’s good to have specific measures going in, such as performance measures, a rubric, an accessibility procedure, etc. so that you have some objective basis for evaluating the field test beyond anecdotal evidence. For high-risk features like A.I., there may need to be multiple phases of field testing.
STEP 9: Prepare for Release. The new solution needs to be integrated with a platform, product, website, or app. There may be support documentation or videos that need to be created or updated. Will training be needed? Does it impact contracts or policies that need to be changed? How will the new solution or resource be communicated to the people who will use it?
STEP 10: General Release. Congratulations! Now your new co-designed solution is generally available. Mission accomplished, right? Well, yes and no. Yes, give yourself a pat on the back. But no, the journey does not end here. You still need to monitor adoption and impact at scale through data collection. There will probably be errors or issues that reveal themselves at scale that were too rare to spot in field testing. You will need to support and update the solution over time. And, you may need to expand the set of features or resources in phases in order to achieve the original co-design vision.
In short, there always needs to be a roadmap. In fact, you may find a need to revisit this 10-step process many times. Co-design is like a well. You need to keep going back to it for another dip to refresh and reinvigorate the solutions you use — to make sure that the roadmap does not deviate too far from the original purpose and needs of your stakeholders.
Champions Program
This is why Speak Agent launched its “Champions” program in the summer of 2026. We wanted to formalize and expand the co-design work we have done informally with stakeholders for years and add more structure to the process. We are collaborating with a diverse group of educators across content areas and grade levels. For participating educators, it’s a unique professional learning opportunity to grow their expertise and to co-design new features together with Speak Agent.
Given the success so far, I have no doubt we will continue to strengthen this program in 2027 and expand to more participants!